Anaconda and Jupyter Setup for Research
I often use Anaconda and Jupyter Lab for my research projects. Creating different Conda environments for separate projects enables reproducibility of my research code, as I can easily share setup instructions for the same environment with my colleagues. At the same time, if my research uses a library that requires a certain version of Python, I can easily set up a Conda environment for that Python version. Meanwhile, Jupyter Lab allows me to prototype my ideas in a flexible layout where I can easily debug my code, visually showcase results using plots, and prepare a documentation for the project at the same time. To those who may not be familiar with Jupyter Lab, it is essentially an advanced version of Jupyter Notebook, where we can open multiple notebook sessions at the same time, create custom window layouts, and even open terminal sessions.
Because interacting with Conda environments and Jupyter Lab has become a frequent task of my research work, I often find myself Googling the same type of Conda and Jupyter commands. Therefore, I have decided to put together this blog to list some of the most frequent routines I use, with the hope that I’ll refer to this blog as documentation next time when needed. Perhaps, it might be useful for you as well :)
Before we get started, a few things to note. First, I expect to add more content to this blog in time, as I am continuing to learn great useful features of Anaconda and Jupyter Lab. Second, I am going to assume that you already have Anaconda setup on your device. If not, you can refer to the following link: Install Anaconda. Finally, I am using Linux and Mac for my research projects. Therefore, I have no idea if the information below applies to Windows.
Creating a New Conda Environment
I like to create different Conda environments for each of the projects I work on. This is useful because I often work on a lot of projects at the same time. Using separate Conda environments for each allows me to keep the dependencies for each project organized. Also, this way I won’t break my setup for one project while working on a different project. Also, If I do break the installations for a project, I can easily re-create the same environment. This is so much safer than direct installation to the host device. I remember a day at my first internship, at MCGov, where I broke my Python installation while setting up a library. I was not using a virtual environment, like Conda. I spend so much time trying to figure out how the fix it. At the end, I re-installed the OS… So, since then I am using Conda.
The below command can be used to create a new environment:
conda create --name Tensors python=3.8.5
Here Tensors is the name of the conda environment, and the Python version is specified with python=3.8.5. You can change these as you need. I will use the name Tensors for the remainder of the blog.
Then the environment can be activated using the below command:
conda activate Tensors
Or you can also use the below command:
source activate Tensors
Use the below command to deactivate the environment:
conda deactivate
Installing Jupyter Lab
If you already do not have Jupyter Lab installed, let’s do that next:
pip install jupyterlab
Adding Conda Environment to Jupyter Kernel
By default, Jupyter will use the base environment at launch. But we can add Conda environments as kernels for Jupyter. First, we need to install ipykernel.
pip install ipykernel
Next, let’s add the environment to Jupyter. Make sure your new Conda environment is active (source activate Tensors).
python -m ipykernel install --user --name=Tensors
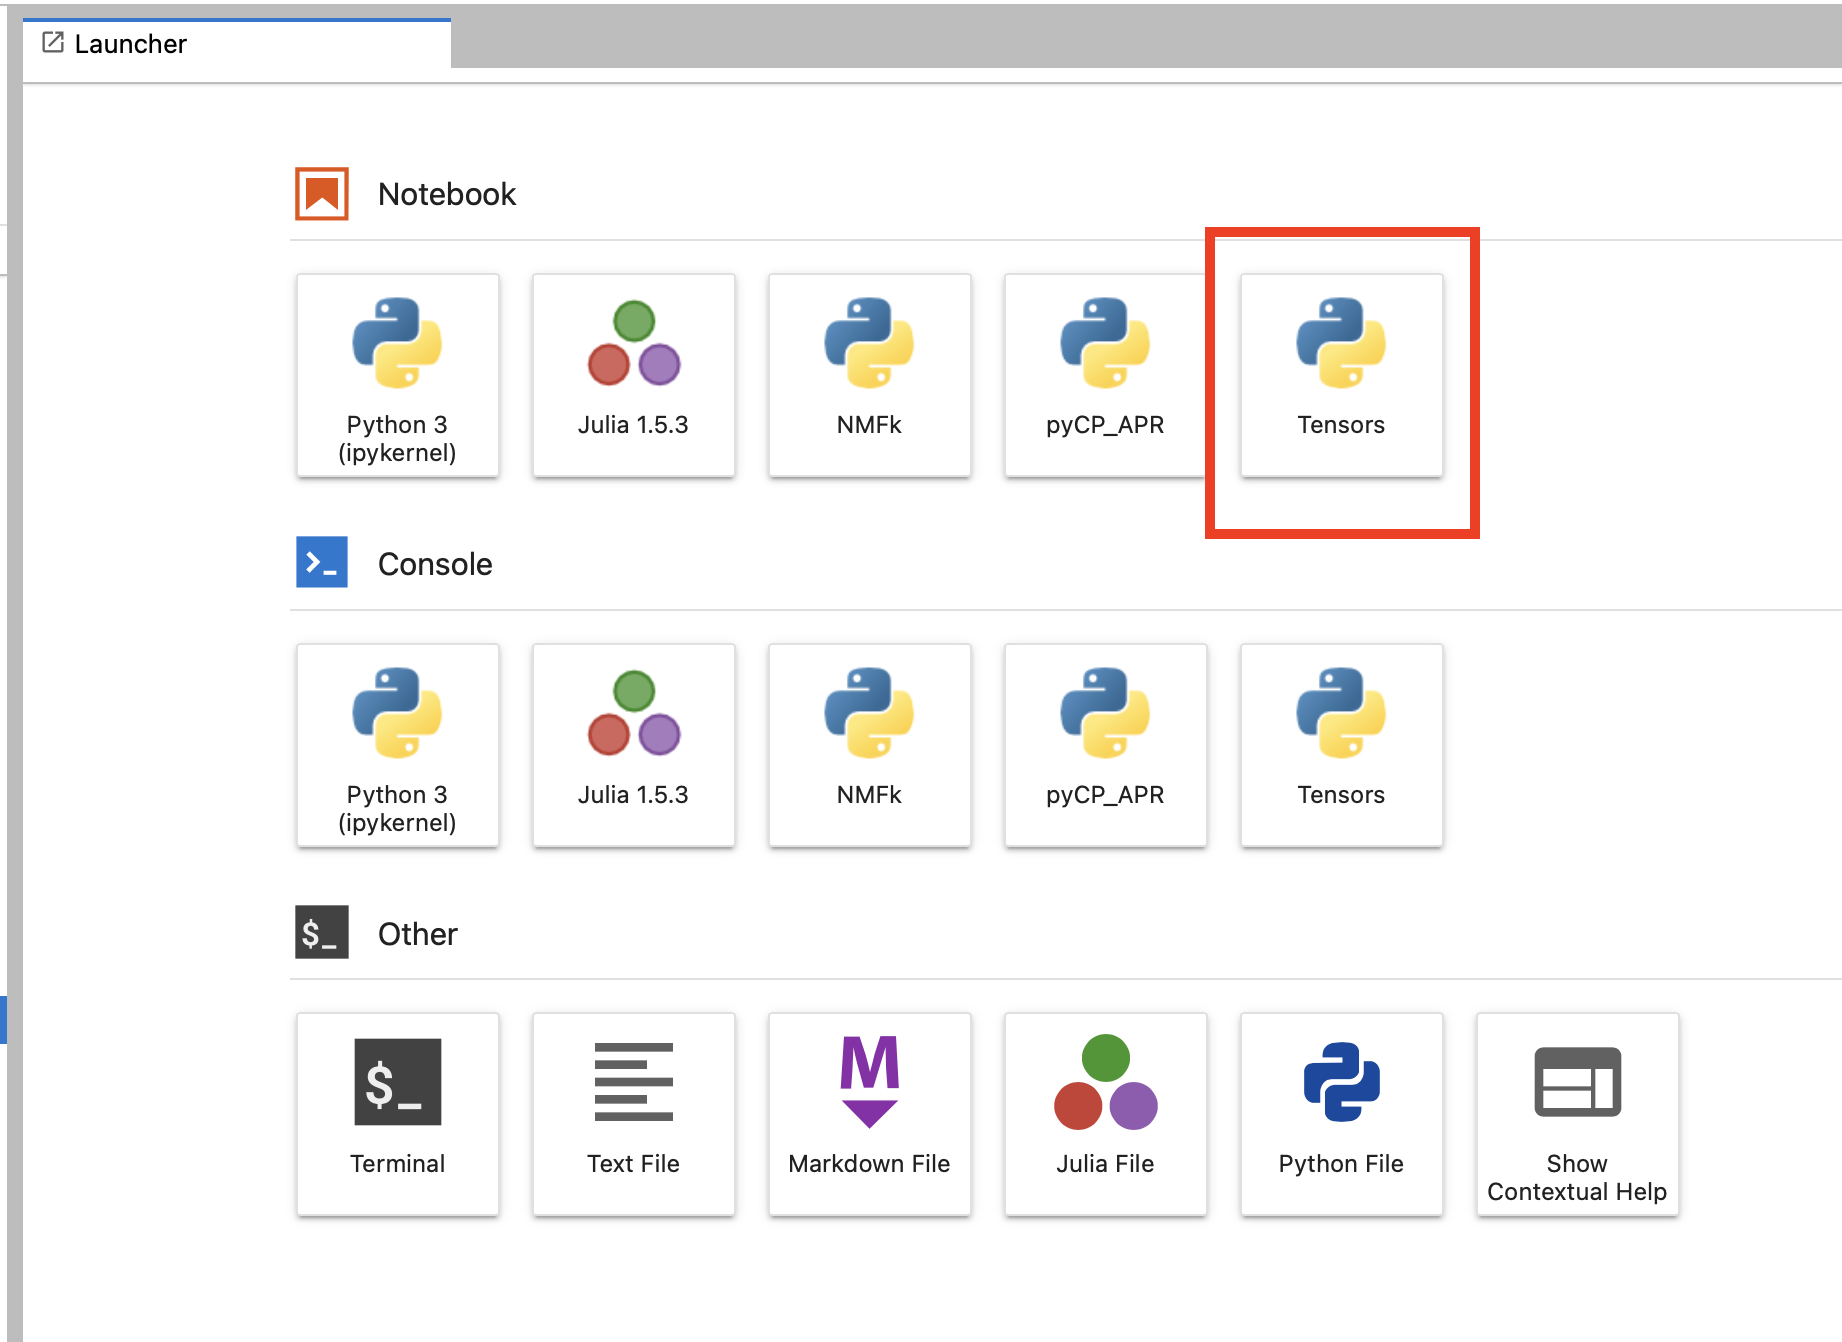
Now when creating a new notebook, we can select our environment:
Or we can also change the environment of a notebook within the notebook using the button on the right top:

Saving the Dependencies
At this point, we might have already installed a bunch of libraries in our environment. It is a good idea to save them. I usually create a requirements file to do that:
pip freeze > requirements.txt
This way, if I need to re-do the environment later, I can install the same dependencies easily using the below command:
pip install -r requirements.txt
Another way to save your dependencies is to crate a .yml file for Conda:
conda env export > environment.yml
Which can then be used to create a new Conda environment using the below command:
conda env create -f environment.yml
Listing and Removing the Conda Environments
You can use the below command to list Conda environments. The active one will have a star next to it.
conda env list
After deactivating the environment, you can remove it using the below command:
conda deactivate
conda remove --name Tensors --all
Listing and Removing Jupyter Kernels
Sometimes I find myself needing to remove a Jupyter kernel. This often happens If I broke something while installing a library, and I need to set up the environment again.
You can list the Jupyter kernels using the below command:
jupyter kernelspec list
Once you identify the kernel you want to remove, below command can be used to do so:
jupyter kernelspec remove tensors
Note that I used the name tensors instead of Tensors because the Jupyter kernel names are saved in lower case.
Maksim E. Eren
Scientist
Maksim E. Eren is a Scientist at Los Alamos National Laboratory, specializing in machine learning and artificial intelligence for large-scale data science applications.