Python Documentation with Sphinx
Sphinx is a tool that can be used to turn in-code comments into modern documentations. Sphinx is utilized by many popular Python libraries and software such as Numpy, Spyder, and Pandas. Previously, I used Sphinx to document pyCP_APR, a library released at my internship (see here). Since then, Sphinx has been my go-to tool for documenting Python code. In this blog post, I will give a short tutorial on how to set up and use Sphinx, and then post the documentation on GitHub Pages.
Install Sphinx and Extensions
Before we begin, we first want to install Sphinx and the extensions we will be using in this tutorial.
pip install sphinx
There are several freely available themes for Sphinx. You can choose the one you like, and install it. I will be using the Sphinx Book Theme.
pip install sphinx-book-theme
I will also be using Bibtex citation feature of Sphinx, and Automodapi which can be installed as an extension.
pip install sphinxcontrib-bibtex
pip install sphinx-automodapi
Directories for Code and Documentation
Next, navigate to the root directory of your project. In this tutorial, we will assume that our code lives in a folder named code, and we are developing a Python library named MyProject. Under MyProject/ we have our Python script(s) which we want to document. We will use setup.py to install our library, and requirements.txt will contain the dependencies.
.
├── README.md
├── MyProject
│   ├── __init__.py
│   └── MyProject.py
├── requirements.txt
└── setup.py
The contents of MyProject/MyProject.py:
import numpy as np

class SomeCode():

    def __init__(self, tol=1e-4):
        self.tol = tol

    def fit(self, X:np.array):
        return np.abs(X) + self.tol
The contents of code/_init_.py:
from .MyProject import SomeCode
Inside the requirements.txt I just have numpy. The contents of setup.py:
from setuptools import setup, find_packages
from glob import glob
__version__ = "1.0.0"

# add readme
with open('README.md', 'r') as f:
    LONG_DESCRIPTION = f.read()

# add dependencies
with open('requirements.txt', 'r') as f:
    INSTALL_REQUIRES = f.read().strip().split('\n')

setup(
    name='MyProject',
    version=__version__,
    author='Maksim Eren',
    author_email='someone@here.com',
    description='Example project for Sphinx tutorial.',
    long_description=LONG_DESCRIPTION,
    long_description_content_type='text/markdown',
    package_dir={'MyProject': 'MyProject/'},
    platforms = ["Linux", "Mac", "Windows"],
    include_package_data=True,
    setup_requires=[
        'numpy'
    ],
    python_requires='>=3.8.5',
    packages=find_packages(),
    classifiers=[
        'Development Status :: 3 - Alpha',
        'Programming Language :: Python :: 3.8.5',
        'Topic :: Software Development :: Libraries'
    ],
    install_requires=INSTALL_REQUIRES,
    zip_safe=True,
    license='License :: BSD3 License',
)
Next, install your library:
python setup.py install
Create another directory named docs at the root directory of your project.
.
├── README.md
├── MyProject
│   ├── __init__.py
│   └── MyProject.py
├── docs
├── requirements.txt
└── setup.py
Setting Up Sphinx
We will next set up Sphinx. Navigate to the docs directory:
cd docs
Run the initial Sphinx command:
sphinx-quickstart
Quickstart will prompt several questions regarding your project such as the name, author, etc. You can fill them out as you wish. But when it prompts Separate source and build directories (y/n) [n]:, respond y. Next, show Sphinx where your code lives:
sphinx-apidoc -o ./source ../MyProject
When the quick start completes, new files will be created like shown below:
.
├── Makefile
├── build
├── make.bat
└── source
    ├── _static
    ├── _templates
    ├── code.rst
    ├── conf.py
    ├── index.rst
    └── modules.rst
Next, edit source/conf.py. You can edit the variables project, copyright, author, and release as you need. Include the extensions you use in the list extensions. This may change depending on the extensions you use.
extensions = [
    "sphinx.ext.napoleon",
    "sphinx.ext.intersphinx",
    "sphinx.ext.autodoc",
    "sphinx_automodapi.automodapi",
    "sphinx.ext.mathjax",
    "sphinx.ext.viewcode",
    "sphinxcontrib.bibtex",
]
Set the autocall content and BibTeX references file:
autoclass_content = 'both'
bibtex_bibfiles = ['refs.bib']
Next, you may add file name patterns that Sphinx should not include in the documentation:
exclude_patterns = ['.ipynb_checkpoints', "version.py"]
Finally, set the theme name you wish to use for Sphinx:
html_theme = 'sphinx_book_theme'
Here is how the final file looks like for me:
# Configuration file for the Sphinx documentation builder.
#
# This file only contains a selection of the most common options. For a full
# list see the documentation:
# https://www.sphinx-doc.org/en/master/usage/configuration.html

# -- Path setup --------------------------------------------------------------

# If extensions (or modules to document with autodoc) are in another directory,
# add these directories to sys.path here. If the directory is relative to the
# documentation root, use os.path.abspath to make it absolute, like shown here.
#
# import os
# import sys
# sys.path.insert(0, os.path.abspath('.'))

# -- Project information -----------------------------------------------------

project = 'MyProject'
copyright = '2021, Maksim Eren'
author = 'Maksim Eren'


# -- General configuration ---------------------------------------------------

# Add any Sphinx extension module names here, as strings. They can be
# extensions coming with Sphinx (named 'sphinx.ext.*') or your custom
# ones.
extensions = [
    "sphinx.ext.napoleon",
    "sphinx.ext.intersphinx",
    "sphinx.ext.autodoc",
    "sphinx_automodapi.automodapi",
    "sphinx.ext.mathjax",
    "sphinx.ext.viewcode",
    "sphinxcontrib.bibtex",
]

autoclass_content = 'both'
bibtex_bibfiles = ['refs.bib']

# Add any paths that contain templates here, relative to this directory.
templates_path = ['_templates']

# The language for content autogenerated by Sphinx. Refer to documentation
# for a list of supported languages.
#
# This is also used if you do content translation via gettext catalogs.
# Usually you set "language" from the command line for these cases.
language = 'Python'

# List of patterns, relative to source directory, that match files and
# directories to ignore when looking for source files.
# This pattern also affects html_static_path and html_extra_path.
exclude_patterns = ['.ipynb_checkpoints', "version.py"]


# -- Options for HTML output -------------------------------------------------

# The theme to use for HTML and HTML Help pages.  See the documentation for
# a list of builtin themes.
#
html_theme = 'sphinx_book_theme'

# Add any paths that contain custom static files (such as style sheets) here,
# relative to this directory. They are copied after the builtin static files,
# so a file named "default.css" will overwrite the builtin "default.css".
html_static_path = ['_static']
Next, create the source/refs.bib to put Bibtex references. As an example, I will be using citation to pyCP_APR in this documentation:
@MISC{Eren2021pyCPAPR,
  author = {M. E. {Eren} and J. S. {Moore} and E. {Skau} and M. {Bhattarai} and G. {Chennupati} and B. S. {Alexandrov}},
  title = {pyCP\_APR},
  year = {2021},
  publisher = {GitHub},
  journal = {GitHub repository},
  doi = {10.5281/zenodo.4840598},
  howpublished = {\url{https://github.com/lanl/pyCP\_APR}}
}
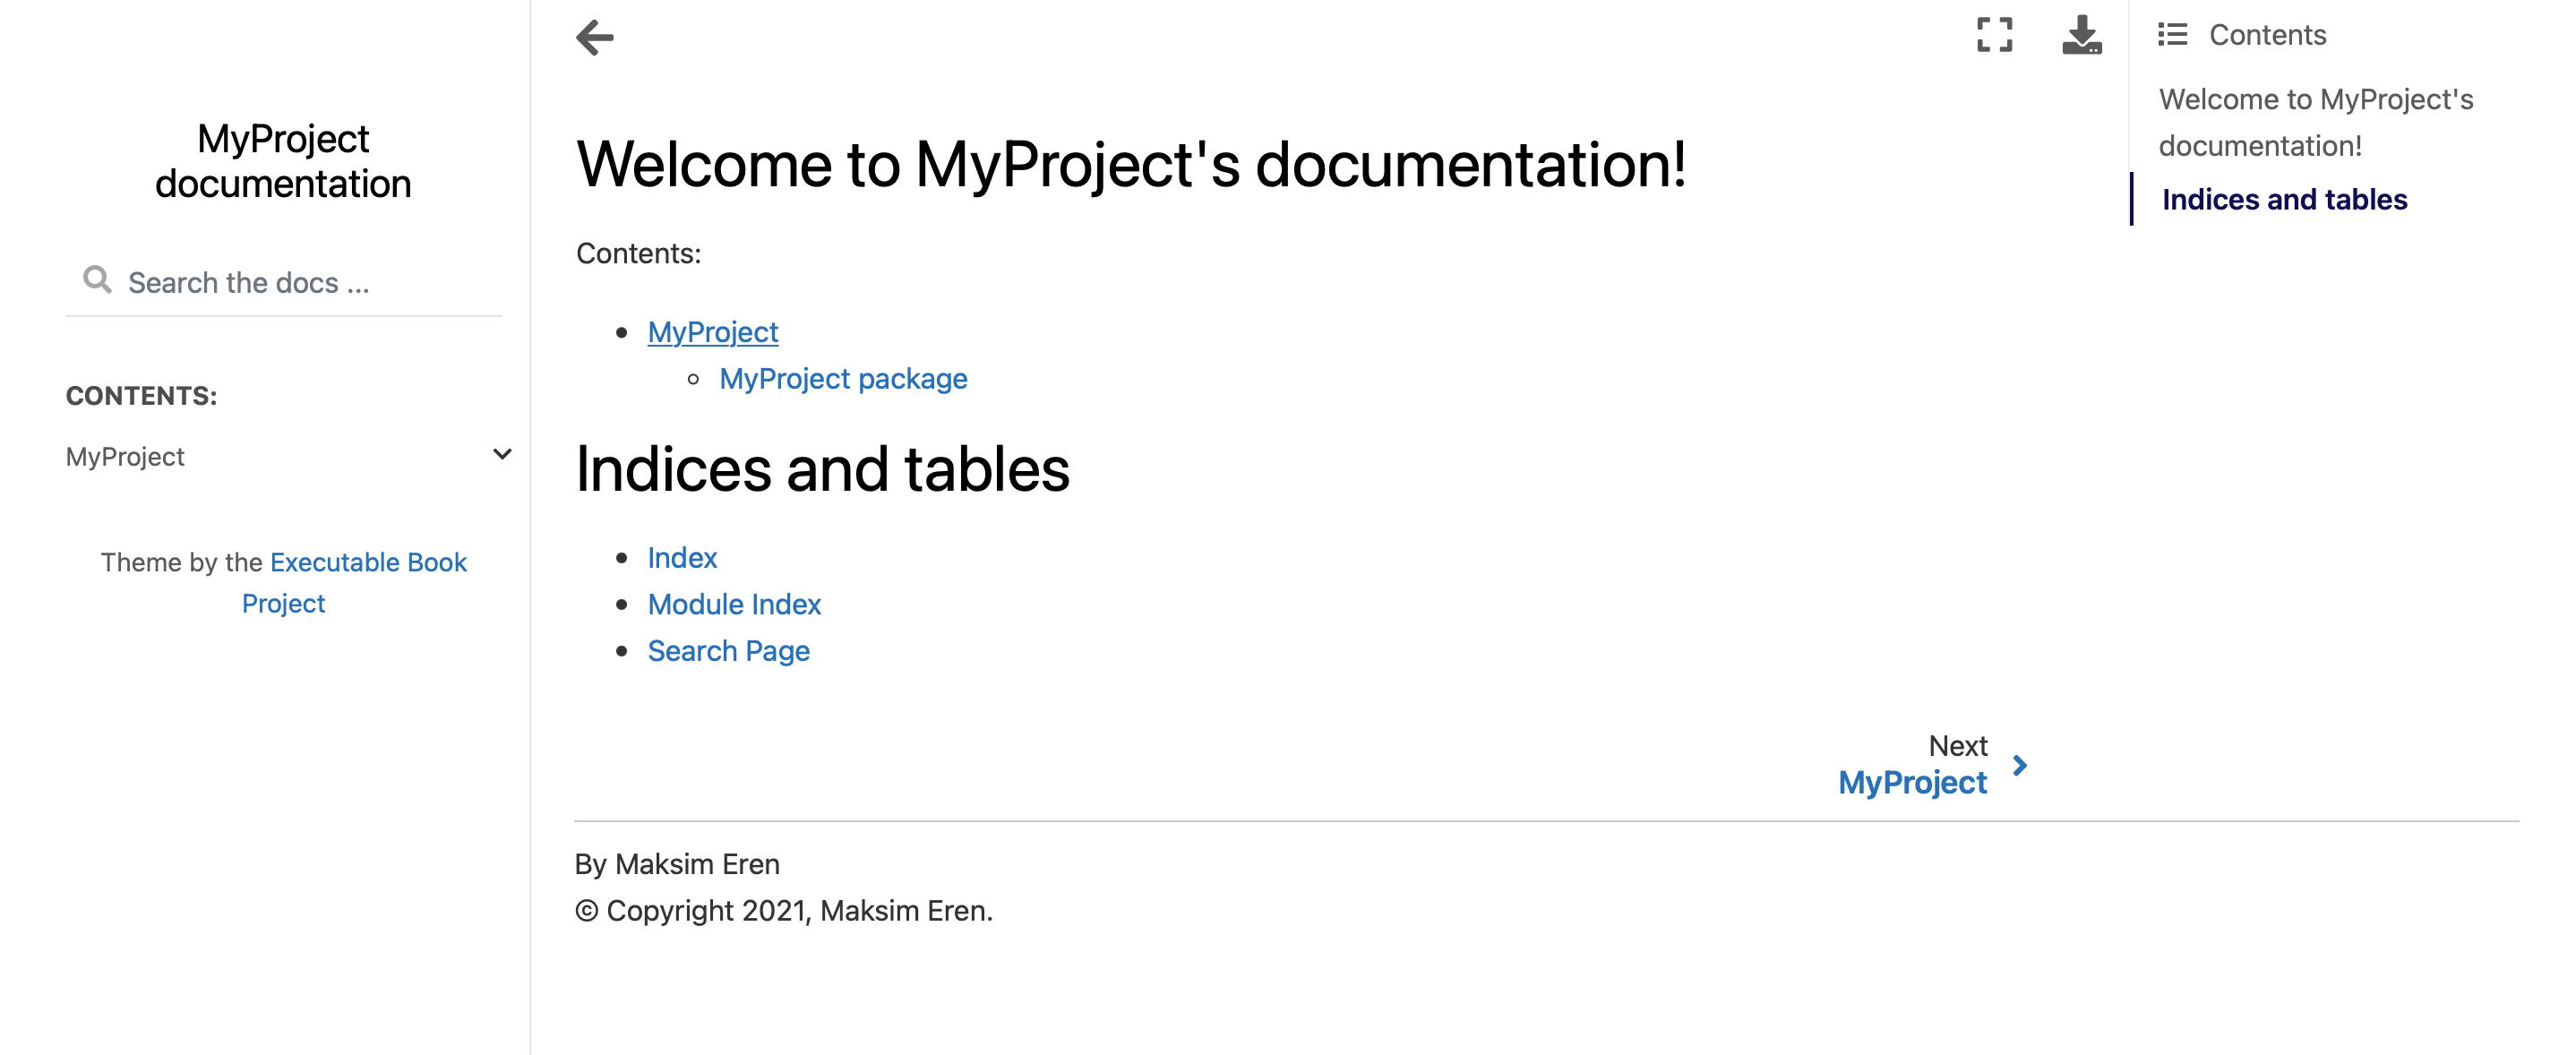
Add modules to source/index.rst:
.. Example documentation master file, created by
   sphinx-quickstart on Wed Dec 29 07:54:18 2021.
   You can adapt this file completely to your liking, but it should at least
   contain the root `toctree` directive.

Welcome to Example's documentation!
===================================

.. toctree::
   :maxdepth: 2
   :caption: Contents:

   modules

Indices and tables
==================

* :ref:`genindex`
* :ref:`modindex`
* :ref:`search`
Finally, run make html to build the documentation. You can now open build/html/index.html on your browser to see the result.
Edit the Homepage
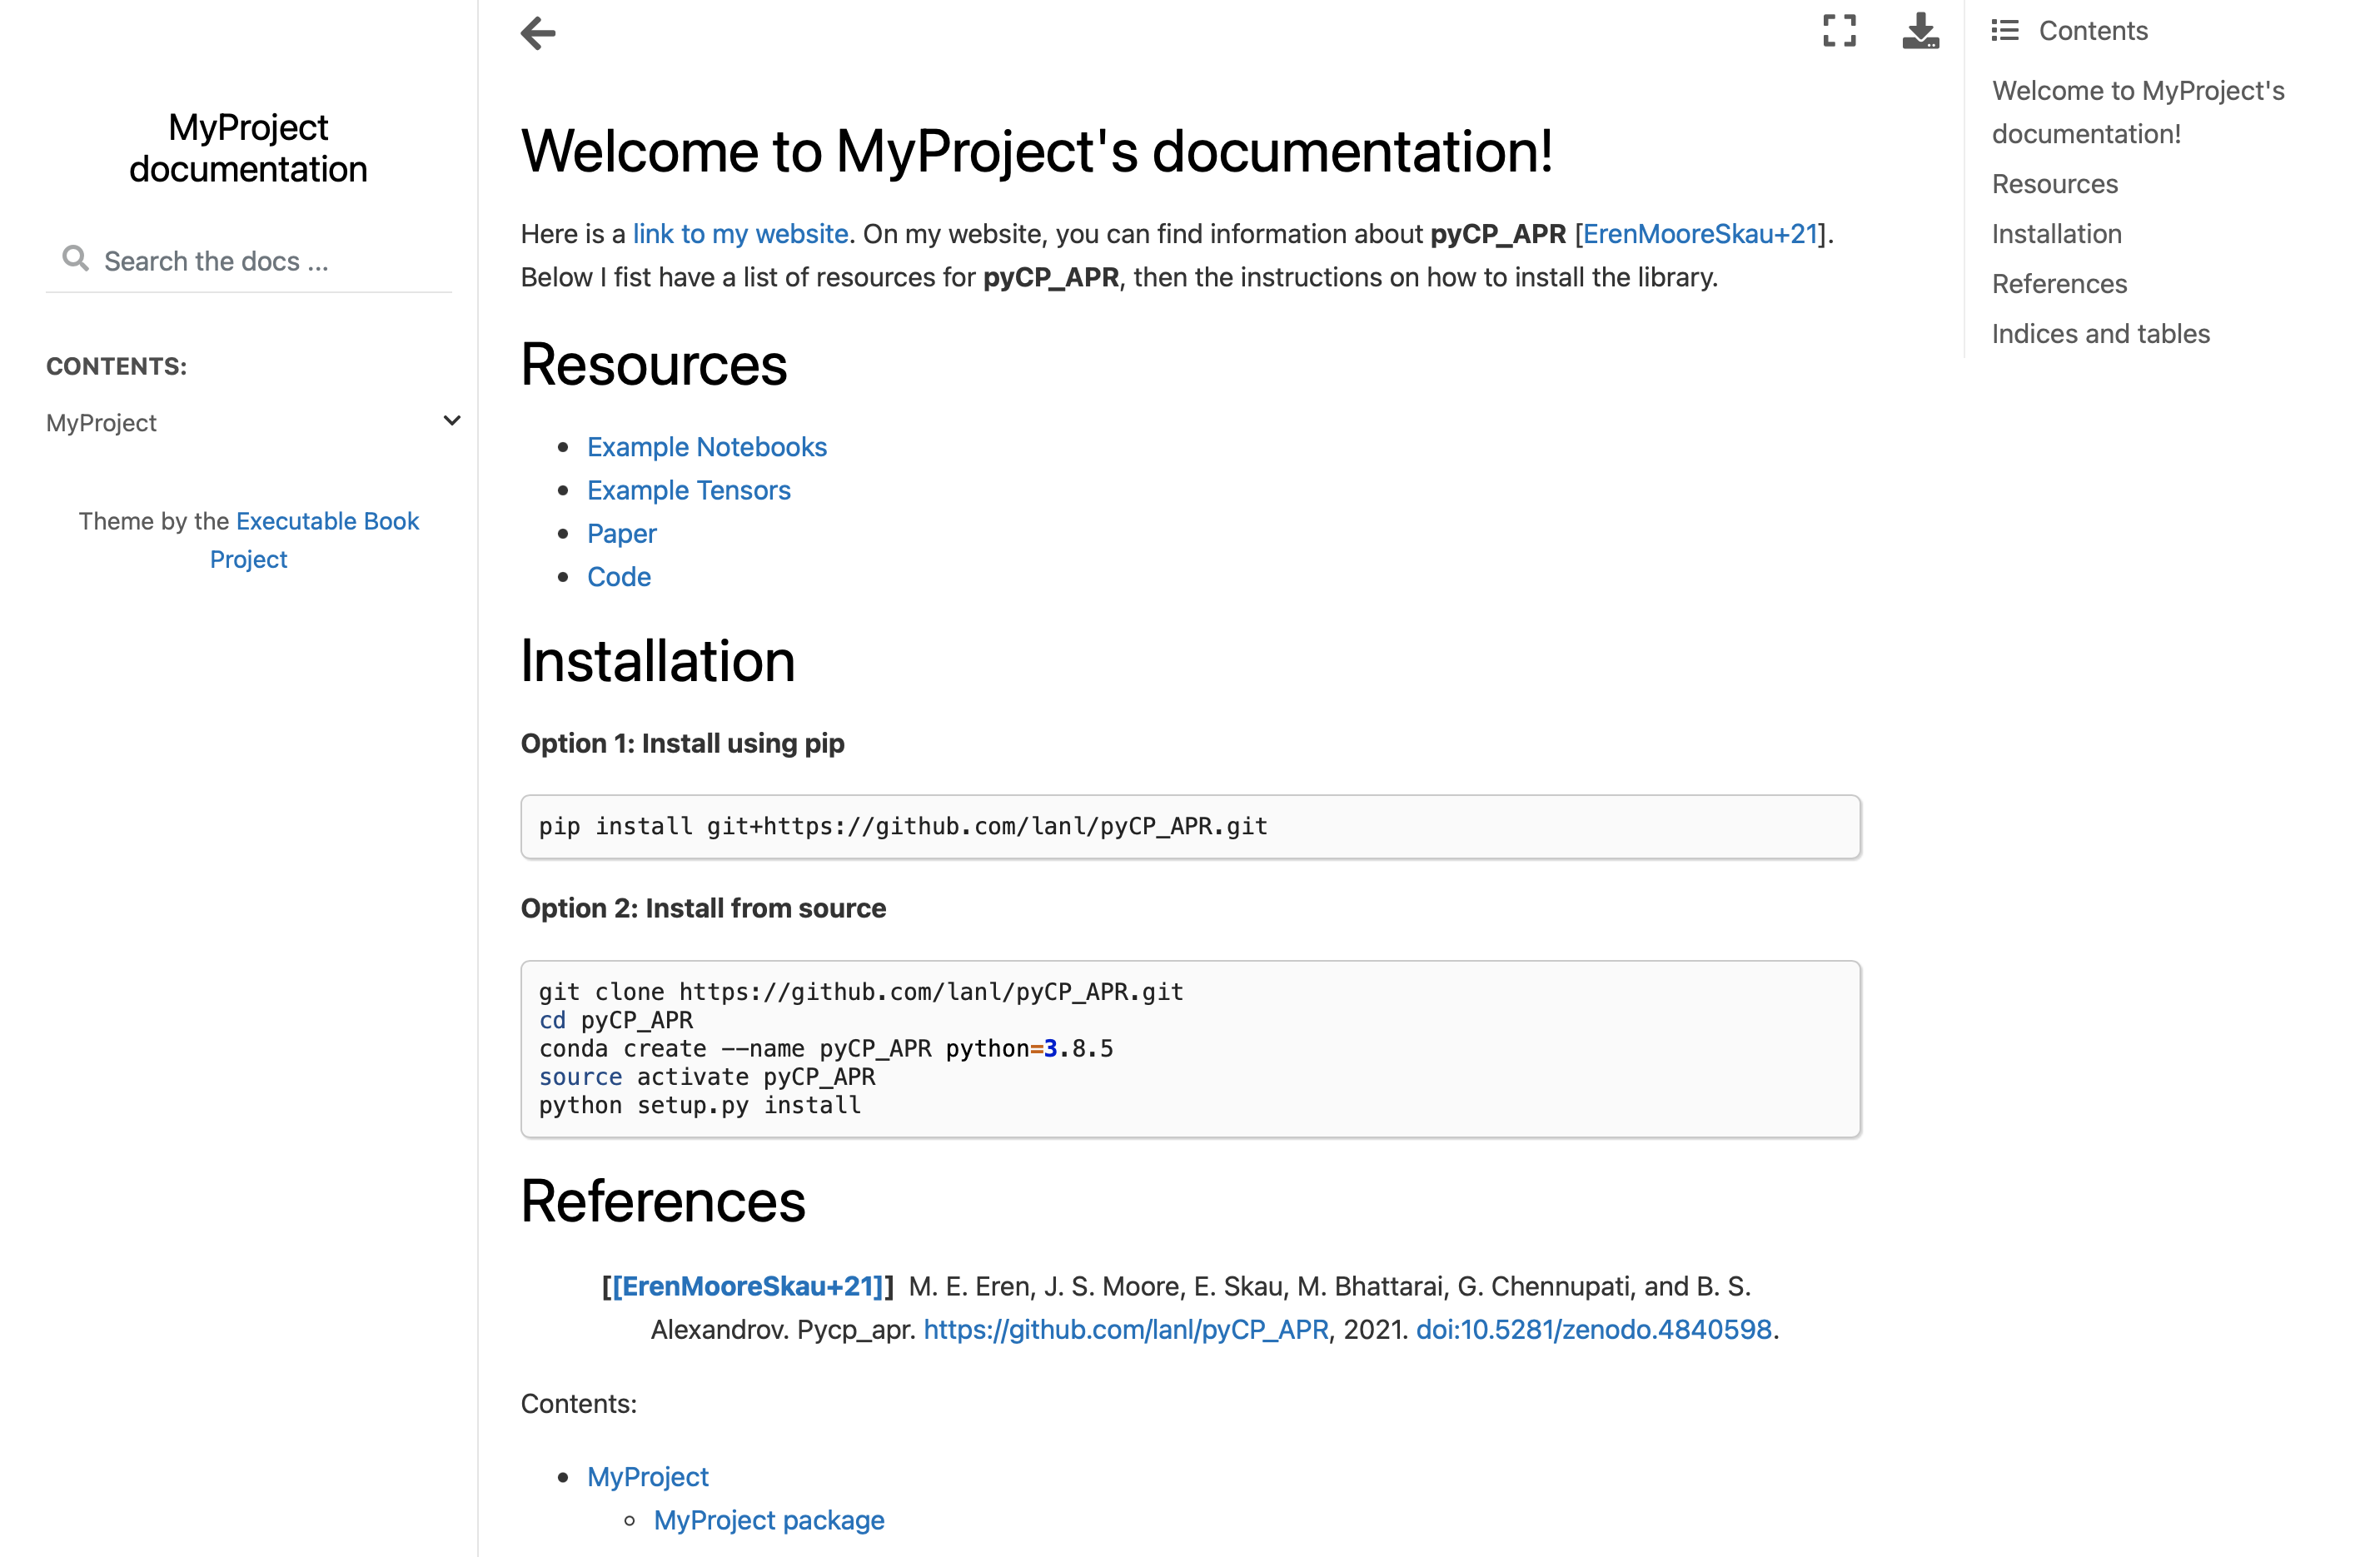
The homepage of the documentation can be modified by editing source/index.rst. As an example, I will add a link to my website, citation to pyCP_APR, a section with a list of links, another section with code blocks, and finally references section:
Here is a `link to my website <https://www.maksimeren.com>`_. On my website, you can find information about **pyCP_APR** :cite:p:`Eren2021pyCPAPR`. Below I fist have a list of resources for **pyCP_APR**, then the instructions on how to install the library.

Resources
========================================
* `Example Notebooks <https://github.com/lanl/pyCP_APR/tree/main/examples>`_
* `Example Tensors <https://github.com/lanl/pyCP_APR/tree/main/data/tensors>`_
* `Paper <https://ieeexplore.ieee.org/abstract/document/9280524>`_
* `Code <https://github.com/lanl/pyCP_APR>`_

Installation
========================================
**Option 1: Install using pip**

.. code-block:: shell

    pip install git+https://github.com/lanl/pyCP_APR.git

**Option 2: Install from source**

.. code-block:: shell

    git clone https://github.com/lanl/pyCP_APR.git
    cd pyCP_APR
    conda create --name pyCP_APR python=3.8.5
    source activate pyCP_APR
    python setup.py install

References
========================================

.. bibliography:: refs.bib
Now run make clean to remove the previous build of the documentation. Then run make html again to apply the changes. Here is how the homepage looks like after the edits:
Documenting Code
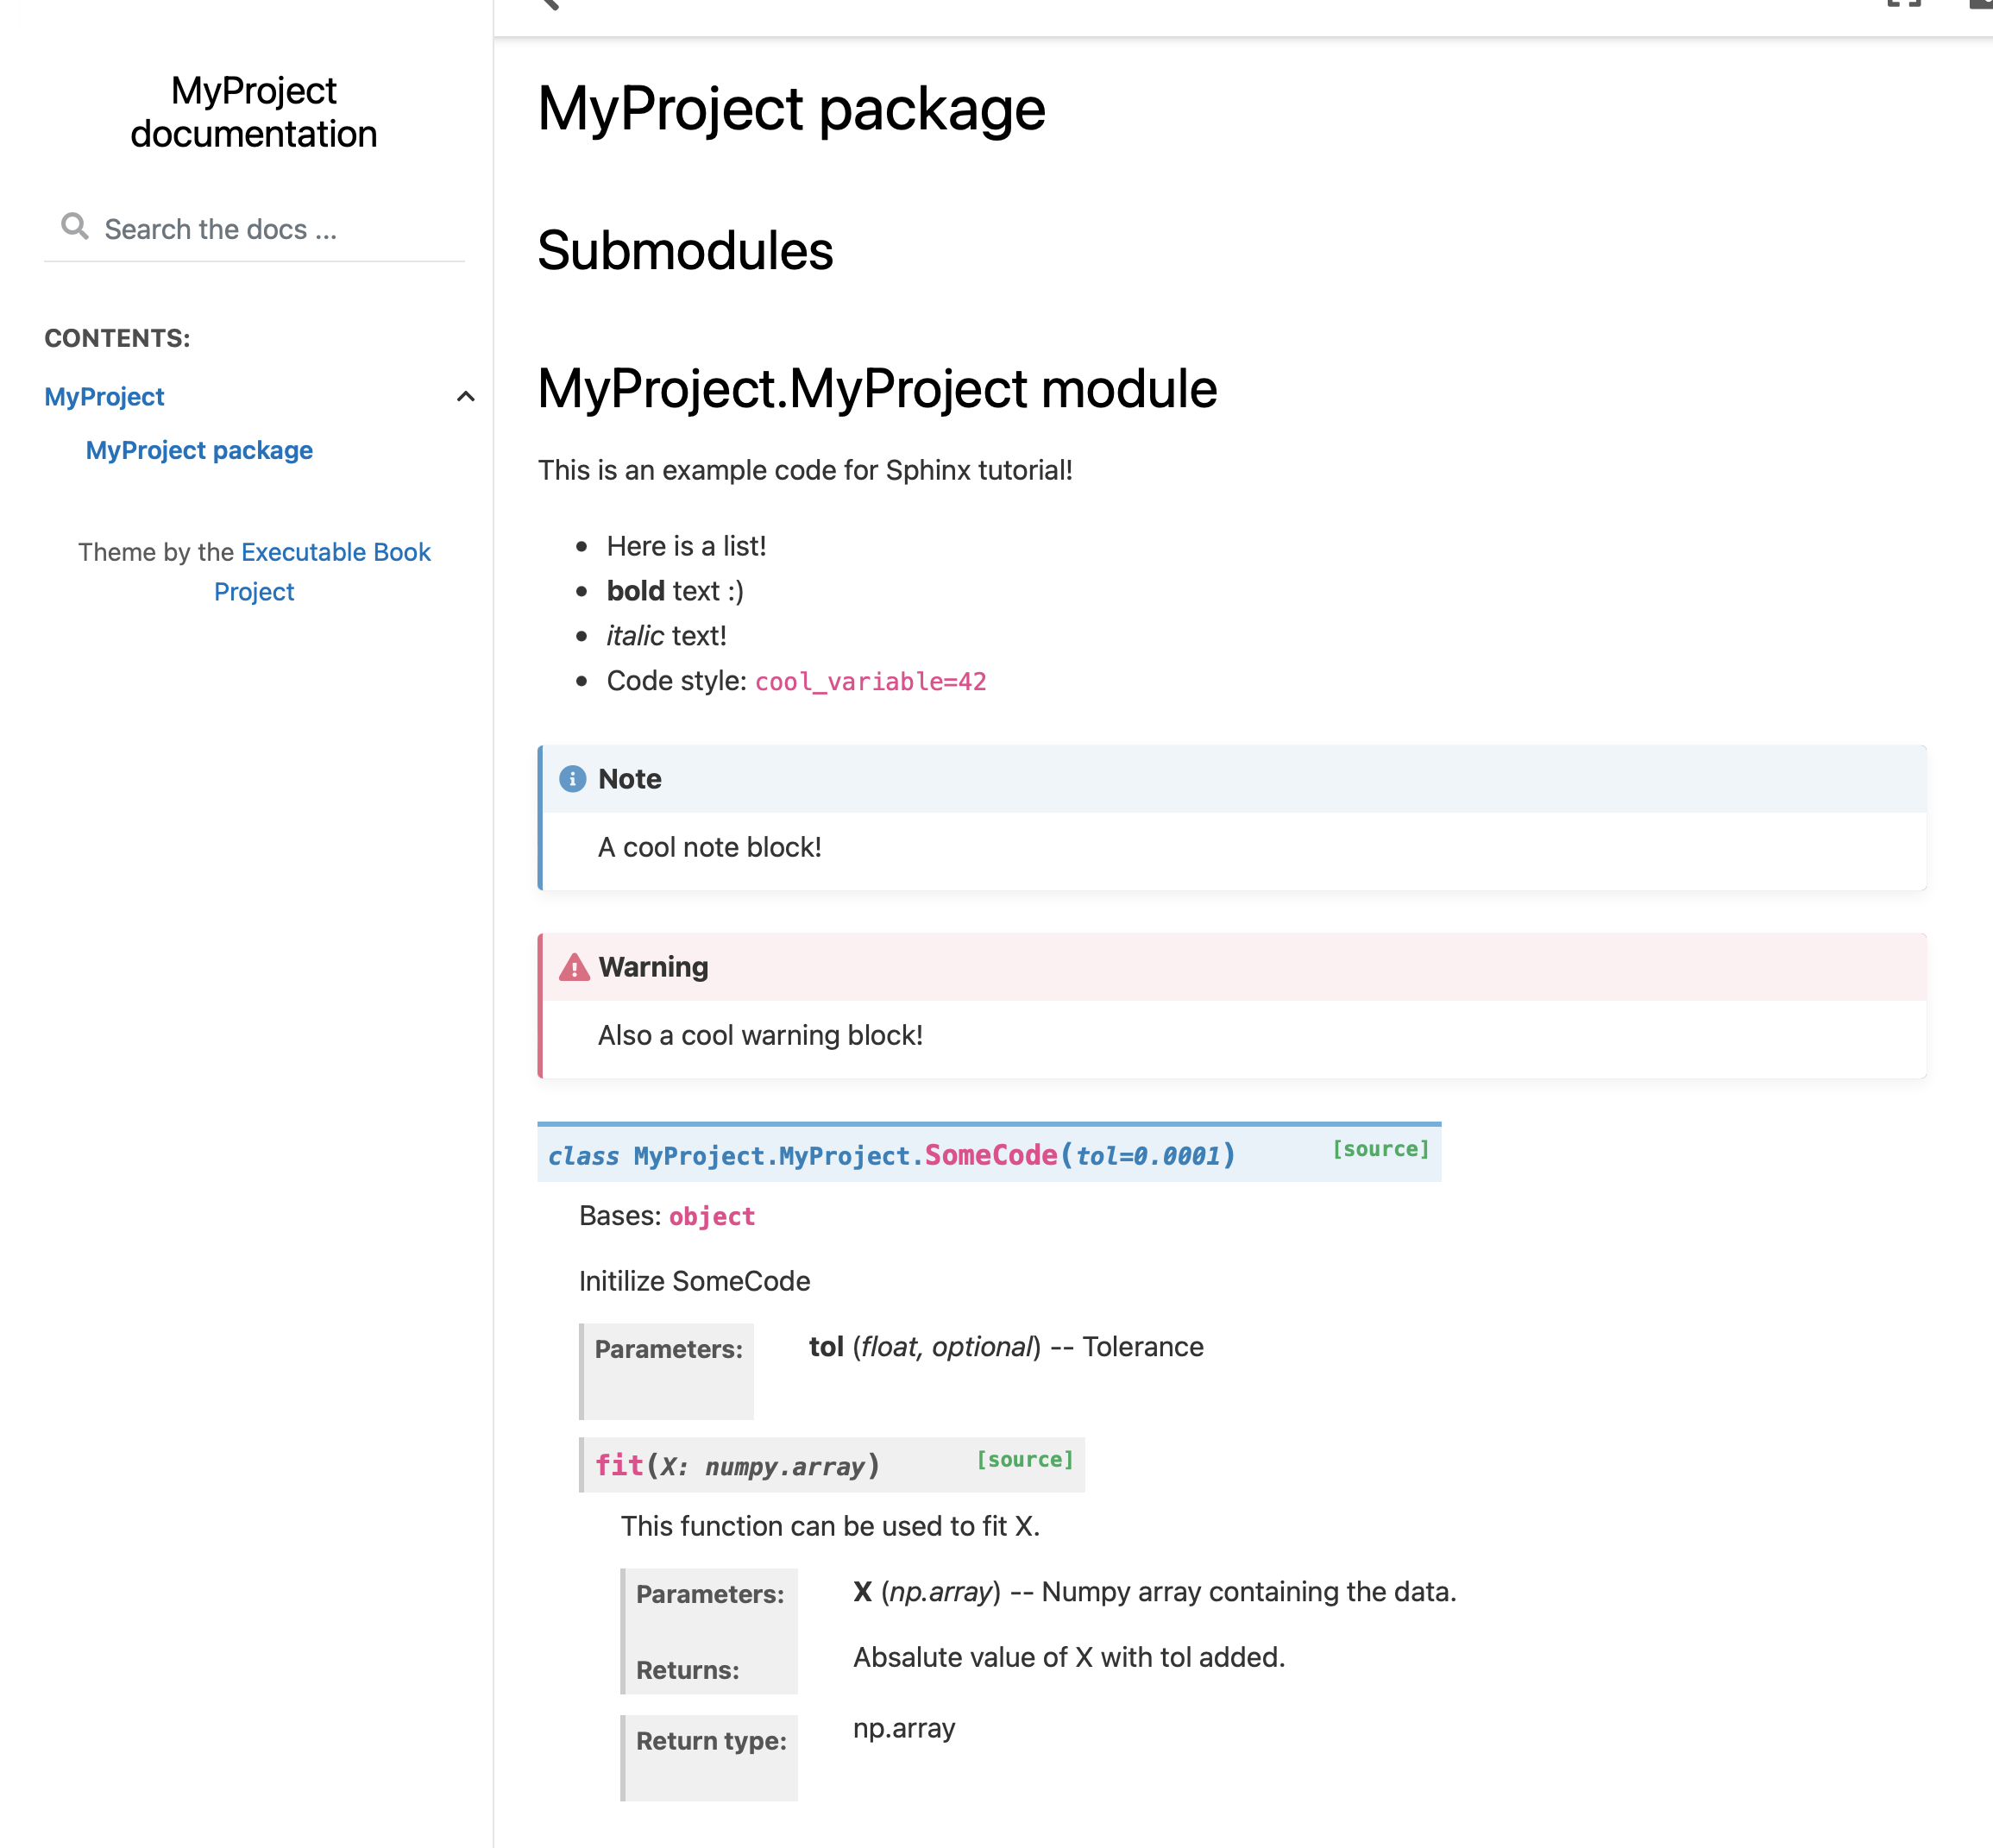
Next, let’s edit ../MyProject/MyProject.py to add documentation. You can copy-paste the below example where I show how the function parameters, return value, and class are documented. Here I also show a list, some markdown styles that can be used in Sphinx, and how to create an information block.
"""
This is an example code for Sphinx tutorial!

* Here is a list!
* **bold** text :)
* *italic* text!
* Code style: ``cool_variable=42``

.. note::
    A cool note block!

.. warning::
    Also a cool warning block!

"""
import numpy as np

class SomeCode():

    def __init__(self, tol=1e-4):
        """
        Initilize SomeCode

        Parameters
        ----------
        tol : float, optional
            Tolerance

        """

        self.tol = tol

    def fit(self, X:np.array):
        """
        This function can be used to fit X.

        Parameters
        ----------
        X : np.array
            Numpy array containing the data.

        Returns
        -------
        np.array
            Absalute value of X with tol added.
        """
        return np.abs(X) + self.tol
Re-install the library to include the changes:
python setup.py install
Navigate back to docs and run:
make clean
make html
Now if you view your documentation on a browser again, and navigate to the MyProject package you will see the changes:
Hosting Sphinx Documentation on GitHub Pages
It is very easy to host your Sphinx documentation on GitHub Pages! First, we want to move the documentation files to somewhere that GitHub can process (run from inside the docs/ directory):
 cp -r build/html/* .
 cp -r build/doctrees .
Next, create an empty file named .nojekyll. So that GitHub will use the Sphinx theme instead of the Jekyll theme. Now you can push your project to a GitHub repository.
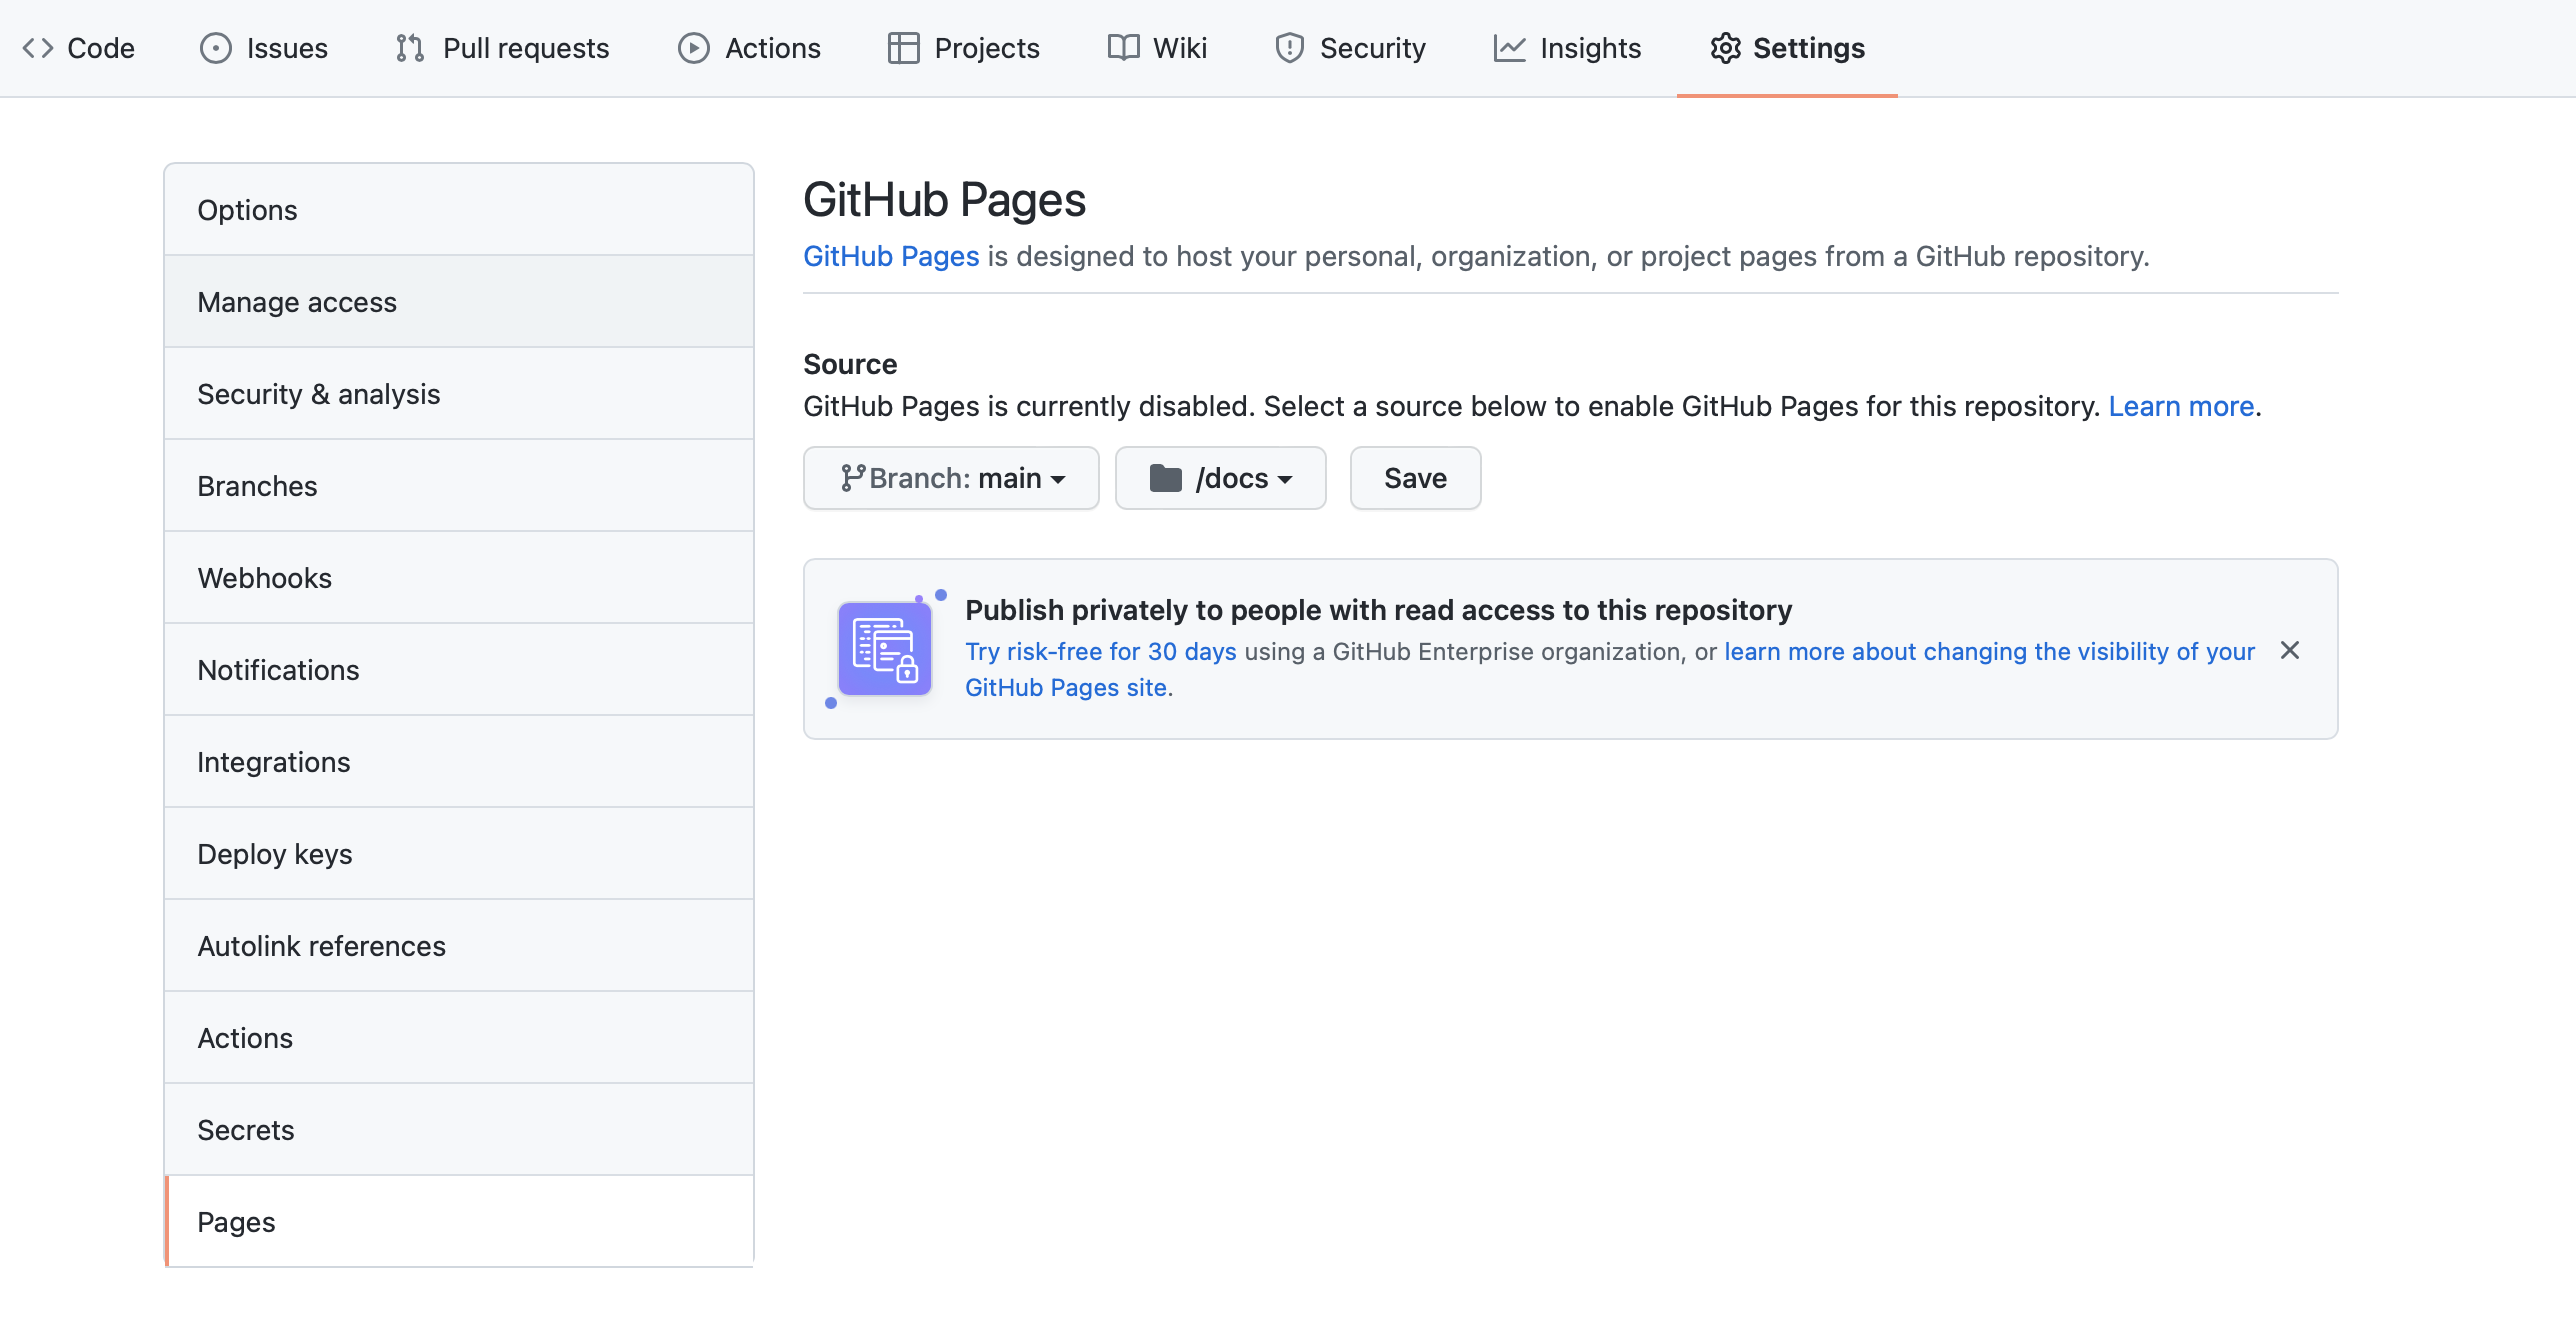
Once you push your code to a GitHub repository. Activate GitHub Pages from the settings:
- Navigate to Settings -> Pages
- Choose source to
main/docs
Full Example
This concludes the tutorial on how to use Sphinx. You may check out my library, pyCP_APR, to see a full example.
Maksim E. Eren
Scientist
Maksim E. Eren is a Scientist at Los Alamos National Laboratory, specializing in machine learning and artificial intelligence for large-scale data science applications.